You are here: Scanning Module "How Do I?" > Scoring > Setting Up a Score Profile
Setting Up a Score Profile
NOTE: The steps in this topic are normally performed by a developer. If you're an operator, feel free to skip this topic.
In this topic
Set up a score profile where the key data are collected at scan-time
Set up subtests and the total score in the score profile
Collect the key data at scan-time
Task
There are many ways to set up a score profile. In this topic, we'll show you how to set up a score profile for a typical test that produces two subtest scores and a total score. If you have different needs, see the Score Profile Dialog Box topic for information on how to set the options in the score profile.
IMPORTANT: This example uses the Form 223022 application that we created in the Application Designer help. If you did not do that, you can follow along with the 801 - Sample 100 Item Answer Sheet application that came with ScanTools. However, that application is not as full-featured and does not include subtest scores.
Procedure
Step 1: Checking for the Proper Fields in Your Application
Before creating a new score profile, you need to check to ensure that your application has fields set up properly so that data are collected.
Open the application that we have been working with (Form 223022 Practice).
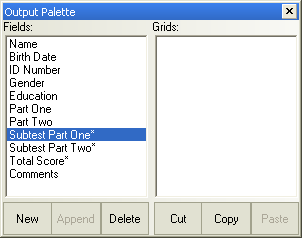
Make sure that the field for the responses to be scored is set up as type 1-digit or 2-digit in the Output Field Entry dialog box. This is often referred to as an Items field. For this example click on the Part One and Part Two field names in the Output Palette to show the Output Field Entry dialog box.
Only 1- and/or 2-digit items that are marked on a key sheet are scored. If there are 1- or 2-digit items on a document that you do not wish to score, do not mark them on the associated key sheet.
Make sure that any field created to store a subtest score is set up as Type Numeric and has a Fixed Length of at least 4 in the Output Field Entry dialog box. There should be no grid associated with that field (an asterisk should be shown after the name in the fields list of the Output Palette). For this example click on the Subtest Part One and Subtest Part Two field names in the Output Palette to show the Output Field Entry dialog box.
Make sure that any field created to store the total test score is set up as Type Numeric and has a Fixed Length of at least 5 in the Output Field Entry dialog box. There should be no grid associated with that field. After again, click on the field name (Total Score) to see the field type.
You have now ensured that your application is ready to collect subtest and total score data.
Step 2: Creating a New Score Profile
Use the following steps to create a new score profile for your application. If your application is still open, close it. These steps are performed using the Scanning Module.
In the Score Profile list, select <New>, then click Create. The Score Profile dialog box opens.
Click on the default Score Profile File Name which is New 1 Score Profile. The Select Profile diialog opens.
Enter the name Form 223022 Practice in the File Name text box. Click OK. If that file name already exists, increment the suffix number.
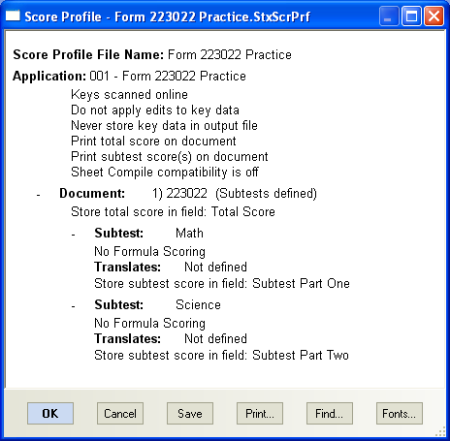
Select the following options for this example where the key data are collected at scan-time:
Keys scanned online
Do not apply edits to key data
Never store key data in output file
Print total score on document
Print subtest score(s) on document
Sheet Compile compatibility is off
NOTE: For a complete description of what each of these options do, see Score Profile dialog box.
A score profile is not complete until at least one subtest is added. For this example, we will create two subtests and also store the total score. Click on the document name which for this example is 223022 and in the dialog box that opens, click Add Subtest. The Add Subtest dialog box appears.
Add the first subtest by entering Math in the Subtest Name text box and clicking OK. The subtest parameters appear in the Score Profile dialog box.
Click on none following the Store subtest score in field parameter. The Subtest Score Field dialog box appears. If you're using the Form 223022 Practice Application that was created in the Application Designer How Do I?" Help, you will see Score, Subtest Part One, and Subtest Part Two listed. Select Subtest Part One and click OK. (If you're just following along, we're associating the Math subtest with the Subtest Part One field that was defined in the application with a Type of Numeric and a Fixed length of 4.)
Click on the document name which for this example is 223022, and in the dialog box that opens, click Add Subtest. The Add Subtest dialog box appears.
Add the second subtest by entering Science in the Subtest Name text box and clicking OK. Again, the subtest parameters appear in the Score Profile dialog box. Associate this subtest with Subtest Part Two as you did in step 7.
Click on none following the Store total score in field parameter. The Total Score Field dialog box appears. Select theTotal Score field for the total score and click OK.
Click Save in the Score Profile dialog box to save the score profile. Then click OK to close the Score Profile dialog box.
That's all there is to creating a new score profile.
Step 3: Trying Out Your New Score Profile
This step requires that you have created the OMR application as described in the Application Designer help and that you have created two keys and at least three student tests using the blank 100 Item General Purpose Answer Sheets (form 223022) that came with ScanTools (see Please Read This First for details).The first key should have only the correct answers for Part One marked. And the second key should have only the correct answers for Part Two marked.
Place your keys and tests in a stack having the following order:
Key with Part One answers (this to feed first)
Key with Part Two answers (this key to feed next)
Student tests (then the tests)
Load the stack into the input hopper of the scanner.
If you have been following along, and have already set up a data file where the data is replaced each time you scan, go to the next step. Otherwise, create a new data file by selecting <New> in the Data File list. Click Create. The New Data File dialog box appears. Enter the name Form 223022 Practice. If that name already exists, add a suffix. Then set the data file to be replaced each time you scan by selecting Options > Scanning Options, then select Replace in the Data and Output Conversion Files group.
Click the Scan button in the ScanTools interface. The sheets should scan.
When scanning is complete, click Stop Scanning in the ScanTools interface.
Click Open next to the data file to open the data file. The Modify Data File dialog box appears.
Use the spinner in the lower right corner of the Modify Data File dialog box to page through the records. Notice that each record has subtest and total scores.
See Help on Help for additional information on using this help file.
ScanTools is a suite of products; the specific information you want may appear in the help for a different module. If you don't find what you're looking for here, try one of the following:
This help system may contain links to third party websites ("Linked Sites"). The Linked Sites are not under the control of Scantron and Scantron is not responsible for the content of any Linked Site, including without limitation any link contained in a Linked Site or any changes or modifications to a Linked Site. Scantron is not responsible for web casting or any other form of transmission received from any Linked Site. Scantron provides Users with the ability to link the Assessment System to the Linked Sites as a convenience to you, and the inclusion of any link does not imply endorsement by Scantron of the Linked Site or any association with its operators.